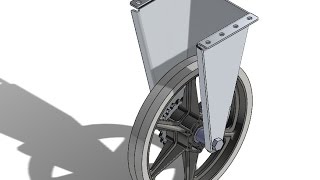
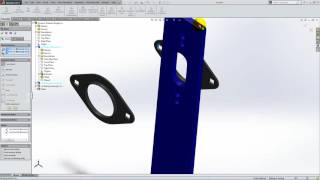
Media Summary: Add a wheel and a gear to a bracket and fix them with hardware to create the Wheel Mount for the chassis of your robot. Finish the mechanical portion of your robot and learn how to create a component in the context of the Follow the process for building a better robot and learn valuable tips, tricks, and design methods. Download the part files for this ...

Unit 3 Assemblies Lesson 3 - Detailed Analysis & Overview

Add a wheel and a gear to a bracket and fix them with hardware to create the Wheel Mount for the chassis of your robot. Finish the mechanical portion of your robot and learn how to create a component in the context of the Follow the process for building a better robot and learn valuable tips, tricks, and design methods. Download the part files for this ... Learn how to create belts to connect the gears from the motors and the wheels. The physical belts are used only for visual ... A few Tips and Tricks before moving on into Create the main frame of your robot using different variations of C channels and add hardware, such as bolts and nuts, to hold ...

You have your kit of parts, but how do you put all of them together? Learn the basics of creating an We've learned how to do mathematics and how to move data in and out of memory, Next we need to learn how to add conditions ...

Photo Gallery

Unit 3: Assemblies - Lesson 3: Wheel Mount
Unit 3: Assemblies - Lesson 5: Main Assembly (Part 3 of 3)
Robot Tutorials - Unit 3: Assemblies Lesson 5  -  Main Assembly Part 1 of 3
Unit 3 - Assemblies
Unit 3 Lesson 3
Unit 3: Assemblies - Lesson 5: Main Assembly (Part 2 of 3)
Unit 3: Assemblies - Lesson 5: Tips and Tricks Primer
ARM Assembly: Lesson 3 (LDR, STR)
Unit 3: Assemblies - Lesson 4: Chassis (Part 1 of 2)
Unit 3: Assemblies - Lesson 4: Chassis (Part 2 of 2)
Robot Tutorials - Unit 3: Assemblies Lesson 2 -  Kicker Part 1 of 2
Unit 3: Assemblies - Lesson 1: Frame Basics of Assemblies
View Detailed Profile
Unit 3: Assemblies - Lesson 3: Wheel Mount

Unit 3: Assemblies - Lesson 3: Wheel Mount

Add a wheel and a gear to a bracket and fix them with hardware to create the Wheel Mount for the chassis of your robot.

Unit 3: Assemblies - Lesson 5: Main Assembly (Part 3 of 3)

Unit 3: Assemblies - Lesson 5: Main Assembly (Part 3 of 3)

Finish the mechanical portion of your robot and learn how to create a component in the context of the

Robot Tutorials - Unit 3: Assemblies Lesson 5  -  Main Assembly Part 1 of 3

Robot Tutorials - Unit 3: Assemblies Lesson 5 - Main Assembly Part 1 of 3

Follow the process for building a better robot and learn valuable tips, tricks, and design methods. Download the part files for this ...

Unit 3 - Assemblies

Unit 3 - Assemblies

Creating

Unit 3 Lesson 3

Unit 3 Lesson 3

Unit 3 Lesson 3

Unit 3: Assemblies - Lesson 5: Main Assembly (Part 2 of 3)

Unit 3: Assemblies - Lesson 5: Main Assembly (Part 2 of 3)

Learn how to create belts to connect the gears from the motors and the wheels. The physical belts are used only for visual ...

Unit 3: Assemblies - Lesson 5: Tips and Tricks Primer

Unit 3: Assemblies - Lesson 5: Tips and Tricks Primer

A few Tips and Tricks before moving on into

ARM Assembly: Lesson 3 (LDR, STR)

ARM Assembly: Lesson 3 (LDR, STR)

Welcome to

Unit 3: Assemblies - Lesson 4: Chassis (Part 1 of 2)

Unit 3: Assemblies - Lesson 4: Chassis (Part 1 of 2)

Create the main frame of your robot using different variations of C channels and add hardware, such as bolts and nuts, to hold ...

Unit 3: Assemblies - Lesson 4: Chassis (Part 2 of 2)

Unit 3: Assemblies - Lesson 4: Chassis (Part 2 of 2)

Complete the Chassis by adding the wheel

Robot Tutorials - Unit 3: Assemblies Lesson 2 -  Kicker Part 1 of 2

Robot Tutorials - Unit 3: Assemblies Lesson 2 - Kicker Part 1 of 2

Follow the process for building a better robot and learn valuable tips, tricks, and design methods. Download the part files for this ...

Unit 3: Assemblies - Lesson 1: Frame Basics of Assemblies

Unit 3: Assemblies - Lesson 1: Frame Basics of Assemblies

You have your kit of parts, but how do you put all of them together? Learn the basics of creating an

Learn ARM Assembly Lesson 3 - Labels, Branch CMP

Learn ARM Assembly Lesson 3 - Labels, Branch CMP

We've learned how to do mathematics and how to move data in and out of memory, Next we need to learn how to add conditions ...