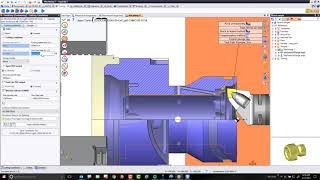
Media Summary: Create your First Tool Path In the second video of this 25-video series on Within the twenty-second video of this 25-video series on Within the sixteenth video of this 25-video series on

Step 2 Programming A Multus - Detailed Analysis & Overview

Create your First Tool Path In the second video of this 25-video series on Within the twenty-second video of this 25-video series on Within the sixteenth video of this 25-video series on add descriptionIn the sixth video of this 25-video series on Within the ninth video of this 25-video series on Within the tenth video of this 25-video series on

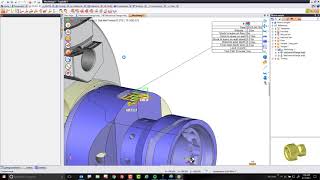
In the seventh video of this 25-video series on Within the fourteenth video of this 25-video series on Within the twentieth video of this 25-video series on Now that we have most of our turning done, in the eighth video of this 25-video series on

Photo Gallery

Step 2 – Programming a Multus U3000 – Turn Front Face with TopSolid
Programming the Okuma Multus
Step 22 - Programming a Multus U3000 - Id Drilling after WCS Repetition
Step16 - Programming a Multus U3000 - Finish Turn ID
Step 6 - Programming a Multus U3000 - Finish turn with B axis at 45 degrees
Step 9 - Programming a Multus U3000 - Use Drag and Drop to Copy Toolpath
Okuma Multus B250II Mastercam Demo!
Step 10 - Programming a Multus U3000 - Verify the Milling Toolpath
Step 7 - Programming a Multus U3000 - Test Synchronizations
Step14 - Programming a Multus U3000 - Copy a tool from another cam file
Step 20 - Programming a Multus U3000 - ID Milling with Multiple Angular Solutions
Okuma MULTUS B300II Multitasking Machine #amb2024
View Detailed Profile
Step 2 – Programming a Multus U3000 – Turn Front Face with TopSolid

Step 2 – Programming a Multus U3000 – Turn Front Face with TopSolid

Create your First Tool Path In the second video of this 25-video series on

Programming the Okuma Multus

Programming the Okuma Multus

Programming the Okuma Multus

Step 22 - Programming a Multus U3000 - Id Drilling after WCS Repetition

Step 22 - Programming a Multus U3000 - Id Drilling after WCS Repetition

Within the twenty-second video of this 25-video series on

Step16 - Programming a Multus U3000 - Finish Turn ID

Step16 - Programming a Multus U3000 - Finish Turn ID

Within the sixteenth video of this 25-video series on

Step 6 - Programming a Multus U3000 - Finish turn with B axis at 45 degrees

Step 6 - Programming a Multus U3000 - Finish turn with B axis at 45 degrees

add descriptionIn the sixth video of this 25-video series on

Step 9 - Programming a Multus U3000 - Use Drag and Drop to Copy Toolpath

Step 9 - Programming a Multus U3000 - Use Drag and Drop to Copy Toolpath

Within the ninth video of this 25-video series on

Okuma Multus B250II Mastercam Demo!

Okuma Multus B250II Mastercam Demo!

Introducing the Okuma

Step 10 - Programming a Multus U3000 - Verify the Milling Toolpath

Step 10 - Programming a Multus U3000 - Verify the Milling Toolpath

Within the tenth video of this 25-video series on

Step 7 - Programming a Multus U3000 - Test Synchronizations

Step 7 - Programming a Multus U3000 - Test Synchronizations

In the seventh video of this 25-video series on

Step14 - Programming a Multus U3000 - Copy a tool from another cam file

Step14 - Programming a Multus U3000 - Copy a tool from another cam file

Within the fourteenth video of this 25-video series on

Step 20 - Programming a Multus U3000 - ID Milling with Multiple Angular Solutions

Step 20 - Programming a Multus U3000 - ID Milling with Multiple Angular Solutions

Within the twentieth video of this 25-video series on

Okuma MULTUS B300II Multitasking Machine #amb2024

Okuma MULTUS B300II Multitasking Machine #amb2024

Flexible, Fast, Efficient: The

Step 8 - Programming a Multus U3000 - Milling an Open Pocket

Step 8 - Programming a Multus U3000 - Milling an Open Pocket

Now that we have most of our turning done, in the eighth video of this 25-video series on