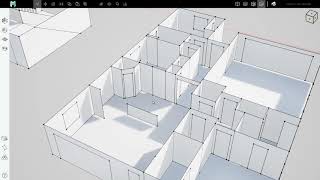
Media Summary: Here's how to draw a plane that will host a Floor into Here's how to draw a series of hip and eave planes, that will each host a Roof, into Move selected objects from along a vector from one point to another. The Move command can use linear snaps and typed ...

Modumate Tutorial 1a Model Your - Detailed Analysis & Overview

Here's how to draw a plane that will host a Floor into Here's how to draw a series of hip and eave planes, that will each host a Roof, into Move selected objects from along a vector from one point to another. The Move command can use linear snaps and typed ... Here's how to elevate a Floor Plan you've transcribed into Select a single object to see dimension strings ("DimString") telling you the lengths of its edges and neighboring distances. Draw horizontal rectangle Massing Planes with the Horizontal Rectangle drawing mode. ---------

In this video, you;ll learn the best practices for "Separators" are the construction assemblies that separate spaces (Walls, Floors, Roofs, Ceilings, Doors, WIndows, Stairs, ... Press Ctrl+Delete to delete only the selected element, and leave behind as many neighboring elements as possible.

Photo Gallery

Modumate - Tutorial 1A: Model Your Massing Graph
Modumate - Tutorial 2A: Model Your Surface Graphs
Modumate - Tutorial 1C: Host Your Separators Onto Your Massing Graph
Modumate Tutorials ◼ Ch.1 Massing Graph ◼ Draw A Floor
Modumate Tutorials ◼ Ch.1 Massing Graph ◼ Draw Roof Hips and Eaves
Modumate In 60 Seconds
Modumate Tutorials ◼ Ch.1 Massing Graph ◼ Move
Modumate Tutorials ◼ Ch.1 Massing Graph ◼ Elevate a Floor Plan
Modumate Tutorials ◼ Ch.1 Massing Graph ◼ DimString Handles
Modumate Tutorials ◼ Ch.1 Massing Graph ◼ Horizontal Rectangle
Stage 1 (Massing), Step 9: Two Ways To Model a Cabinet
Modumate - Tutorial 1B: Craft Your Separators
View Detailed Profile
Modumate - Tutorial 1A: Model Your Massing Graph

Modumate - Tutorial 1A: Model Your Massing Graph

The Massing Graph describes

Modumate - Tutorial 2A: Model Your Surface Graphs

Modumate - Tutorial 2A: Model Your Surface Graphs

Surface Graphs describe the layout of

Modumate - Tutorial 1C: Host Your Separators Onto Your Massing Graph

Modumate - Tutorial 1C: Host Your Separators Onto Your Massing Graph

Separators host onto

Modumate Tutorials ◼ Ch.1 Massing Graph ◼ Draw A Floor

Modumate Tutorials ◼ Ch.1 Massing Graph ◼ Draw A Floor

Here's how to draw a plane that will host a Floor into

Modumate Tutorials ◼ Ch.1 Massing Graph ◼ Draw Roof Hips and Eaves

Modumate Tutorials ◼ Ch.1 Massing Graph ◼ Draw Roof Hips and Eaves

Here's how to draw a series of hip and eave planes, that will each host a Roof, into

Modumate In 60 Seconds

Modumate In 60 Seconds

See

Modumate Tutorials ◼ Ch.1 Massing Graph ◼ Move

Modumate Tutorials ◼ Ch.1 Massing Graph ◼ Move

Move selected objects from along a vector from one point to another. The Move command can use linear snaps and typed ...

Modumate Tutorials ◼ Ch.1 Massing Graph ◼ Elevate a Floor Plan

Modumate Tutorials ◼ Ch.1 Massing Graph ◼ Elevate a Floor Plan

Here's how to elevate a Floor Plan you've transcribed into

Modumate Tutorials ◼ Ch.1 Massing Graph ◼ DimString Handles

Modumate Tutorials ◼ Ch.1 Massing Graph ◼ DimString Handles

Select a single object to see dimension strings ("DimString") telling you the lengths of its edges and neighboring distances.

Modumate Tutorials ◼ Ch.1 Massing Graph ◼ Horizontal Rectangle

Modumate Tutorials ◼ Ch.1 Massing Graph ◼ Horizontal Rectangle

Draw horizontal rectangle Massing Planes with the Horizontal Rectangle drawing mode. ---------

Stage 1 (Massing), Step 9: Two Ways To Model a Cabinet

Stage 1 (Massing), Step 9: Two Ways To Model a Cabinet

In this video, you;ll learn the best practices for

Modumate - Tutorial 1B: Craft Your Separators

Modumate - Tutorial 1B: Craft Your Separators

"Separators" are the construction assemblies that separate spaces (Walls, Floors, Roofs, Ceilings, Doors, WIndows, Stairs, ...

Modumate Tutorials ◼ Ch.1 Massing Graph ◼ Minimal Delete

Modumate Tutorials ◼ Ch.1 Massing Graph ◼ Minimal Delete

Press Ctrl+Delete to delete only the selected element, and leave behind as many neighboring elements as possible.